


 Limited")

This guide will show you how to dye a leather sofa a different colour. We will be changing of a small seat from a light beige colour to maroon to demonstrate the correct procedure of changing the colour of leather.
A colour change can be made from any colour to another, i.e. black to white, or white to black, with just as successful results.
The Leather Colourant Kit used in this guide (although it is often referred to as a Leather Dye Kit) can be used to change the colour of all leather, vinyl, plastic, PVC & leather car interiors.
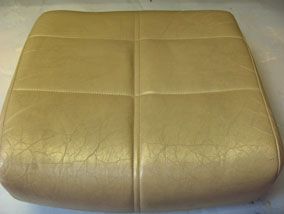
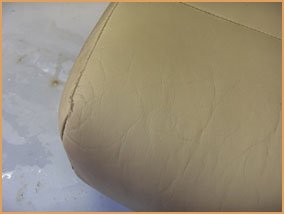
This photo shows a seat cushion we will be changing from beige to maroon.
PRODUCTS REQUIRED
Whilst many leather sofa dye and preparation products are needed, we have put them together in a kit specifically designed for dyeing and changing the colour of leather.
Leather Colourant Kit - Used to change the colour of leather.
STEP 1. PREP THE LEATHER
The first step is preparing the leather ready for applications of colour. We do this to remove any waxes, oils or silicones that may be present on the leather. Not removing these could cause adhesion problems. Prepping the leather also removes the manufactured finish. If the leather is very dirty, clean it first with our Leather Cleaner.
Do the back and sides first. A lot of furniture these days have finished splits on the back and sides and using a strong cleaner like the Leather Prep would strip the colour off so we won't be using it on the sides. For the sides all you need to do is wipe them down with some Alcohol Cleaner on a cloth. Not prepping the back and sides as thoroughly as the rest of the leather won't affect the end results, this is because the back and sides aren't really used and so come under no, or very little stress
Because the seating cushions and other areas come under more stress (wear & tear) it is important to prepare them. To do this it is best to rub them with the Leather Prep and an abrasive pad, this application removes the leather finish. A good way to apply this is to place two cotton wool balls on the abrasive pad and then wet them in prep, fold the abrasive pad over the balls and then use it to rub the leather. This way applies the prep in the correct and sparing way making the product last longer.
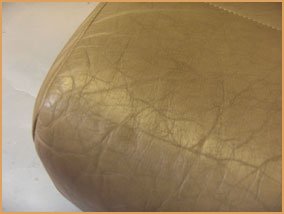
Prepping the leather in this manner will remove any creased and cracked areas on the leather. So it not only makes the leather ready for colouring but it greatly improves its appearance. Any severe cracks can be filled using Heavy Filler.
The leather is correctly prepped when you start to see colour transfer from the leather onto the abrasive pad or cloth. This indicates that the finish has been removed exposing the colour beneath. Any distinctive creases in the leather may wear through quicker than other areas once colour is applied (this would only happen on a colour change job, and is just a maybe). To reduce the chance of this happening use our #100 Sanding Pad (320g) with Leather Prep and rub along the crease to reduce it. Then proceed to the next step.
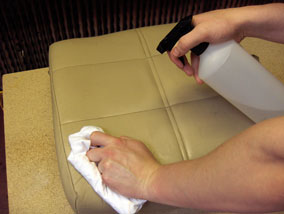
STEP 2. CLEAN THE LEATHER WITH ALCOHOL CLEANER
The previous step will have removed the manufacturers finish and any silicones that are soluble in solvents. There are however some silicones like spray on polish and waxes that aren't soluble in solvents, and so to remove these we need to use the Alcohol Cleaner.
After using the Leather Prep wipe the leather down with a cloth dampened in the Alcohol Cleaner. For ease of use you could also spray the Alcohol Cleaner directly onto the leather. Now wait at least 30 minutes for the cleaners to evaporate; ideally overnight.
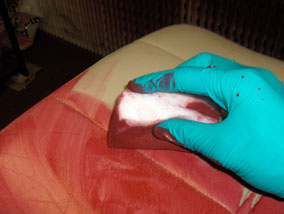
STEP 3. APPLY THE FIRST COAT OF LEATHER SOFA DYE (LEATHER COLOURANT)
Shake the bottle of colourant for about three minutes to make sure it is well mixed. Pour a small amount onto a sponge and rub into the leather. The idea is to sponge on a thin coat of colour working it into any gaps, creases and hard to reach areas. Apply light pressure here to work the colourant into the grain. If you apply too much pressure you may get a foam of colour on the surface, this is not a problem, just wipe it away with the sponge (gently).
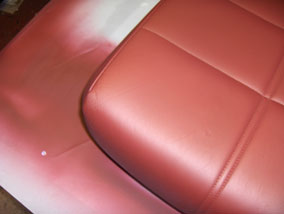
The image to the left shows what the leather should look like after one application of colour. DO NOT try to achieve a perfect finish with the first coat.
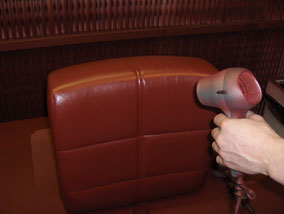
The colourant dries naturally or you can speed it up with a hair dryer. After applying one base coat, apply two more coats of colourant in the same way as before. You can actually achieve a good finish without even spraying any colour on! However it is best to spray some on as well.
IS IT A LEATHER SOFA DYE?
In this kit we're using a product called Leather Colourant, although most people look for leather dye when wanting to restore leather. But it is important to remember that most leather is not actually dyed, and so leather dye is not the right product to use. Even when leather is dyed, it is then normally finished with a coat of Leather Colourant afterwards.
The first step was to prep (remove/reduce) the original coating on the leather. In this step we are re-applying that coating.
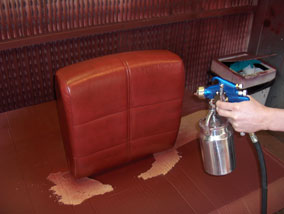
STEP 4. SPRAY ON THE COLOURANT
Wait 30 minutes for the Colourant to thoroughly dry and then proceed to spray the Colourant onto the leather. Set up your spray gun or airbrush and then spray the leather at a comfortable distance, being careful not to over apply the colour. It is best to practice a bit on a piece of paper to get the hang of spraying first. Spray the Colourant on in thin layers. This avoids runs and so makes for a nicer finish.
Because the Colourant we're using is water based it takes a few minutes to dry. We therefore advise you to spray one area and then dry it using a hair dryer. Doing it this way reduces the chance of runs. If you do see a run, just dab it off with a cloth or sponge and then re-spray the area.
There is no right number of coats that should be applied to the leather. Spray on one coat and dry it off, then just keep spraying on a coat at a time until all the base colour is hidden. When you are happy that sufficient colourant has been applied, the Leather Finish should be sprayed on to the leather.
STEP 5. APPLY THE FINISH
The Leather Finish is the same finish that we removed at the start of the process. It’s applied by airbrush so it’s important to ensure your airbrush is cleaned thoroughly after spraying the Leather Colourant.
The kit contains both Gloss and Matt versions of the Leather Finish, which can be mixed together at different ratios to achieve the right level of sheen for your leather. Here is a quick guide to achieving different sheens:
Gloss: 100% Gloss
Semi-Gloss: 75% Gloss and 25% Matt
Satin: 50% Gloss and 50% Matt (this is often used on leather furniture)
Semi-matt: 25% Gloss and 75% Matt (this is what you’d normally find on a car interior)
Matt: 100% Matt
It’s important to thoroughly shake each bottle before opening.
Mix the finishes together to create the version that you’re after, using the guide above as a reference. Once mixed, test the finish on an inconspicuous are to make sure you’re happy with it. You can adjust it by adding more matt or gloss, as needed. If you’re unsure what finish you want, start with Satin and adjust as required from there
Once you’ve found a mixture you’re happy with, it’s time to add the Crosslinker Eco. This should be added at a ratio of roughly 1:8. For reference, add 15ml of Crosslinker to 125ml of Finish.
The finish is applied exactly the same way as the colourant. When you spray the Leather Finish onto the leather, make sure it is dry before spraying on a second coat. Like the Leather Colourant, you can use a hairdryer to speed up this process.
Once the job is complete, wait one day before using the leather.
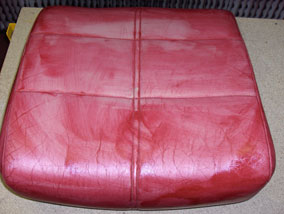
THE FINISHED PRODUCT
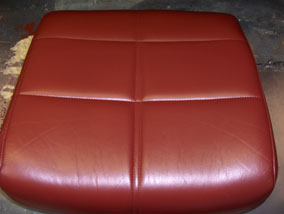
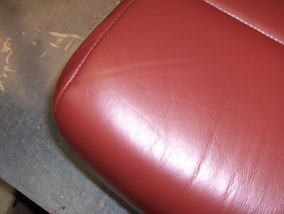
The above two images are of the seat thoroughly coloured. As standard the leather has a slight shine to it. This can be either increased using a gloss finish, matted down using a matt finish or kept the same using a satin finish. Our customer required a matt finish for this item, which is shown in the pictures below.